Receive all updates via Facebook. Just Click the Like Button Below...

Unborn 8.0 Aqua Pointer
~~

Thursday, January 31, 2013

Trick To Show Only Online Friends On Facebook Chatbox In Google Chrome


Hello friends, today i am sharing trick with which you can see only online friends on facebook chatbox. If anybody does’t want to see offline friends on chatbox then this post is only for you. You have to install “Facebook Chat Fix” extension on your Google Chrome browser.

Step to install the extension.

Click here to install the extension on your browser.
- Install it by clicking “Add To Chrome“.
- That’s it !
So Finally Your extension is installed in your browser. Now Check your facebook chatbox and enjoy.
If you like this post then post your valualble comments and subscribe us. If any problem then i am always here to help you

Sunday, January 27, 2013

Get 3G Speed In 2G Internet PlansFor Docomo Users


1. Simple trick is here if u recharge to lowest 3G Recharge before the 48 recharge it should give u 3g speed , In short recharge it with smallest 3G voucher and than with 2g plan you will get 3g speed. FORE MORE dial *141# and select 3g data plan select lowest data plan and use it Try it and reply Enjoy guys 2.Another trick for 3g speed in 2g Plan Just do this below settings and you are done with the speed plans. 

1. First activate your Tata Docomo 2G Internet Plan Of 15 rs (500MB) 
2. And then make your balance to 1-2rs 
3. Now dial *141# and then select “3G Internet Plans” and select your state 
4. Now activate lowest 3G Internet plans like of 11 rs or 9 rs 
5. Now you will get the message of no balance so we can’t activate this 3G plan 
6. Just ignore this message and now check your internet downloading speed of Tata Docomo 3G 
7. Enjoy 3G Speed In Old 2G Internet Plans In Tata Docomo Note : This Tricks will only work where their is Tata Docomo 3G networks. Will work where you get the Tata Docomo 3G Networks Here Is step By step Procedure.. Send:*141*1# Receive:3G Packs- Choose your region (Available in select towns): 
1.UPW 2.PUN 3.HAR 4.GUJ 5.RAJ 6.MP 7.KER 8.KAR 9.MAH Send:2 Receive:1.10MB free 3G @Rs.11 
2.25MB Free 3G @ Rs.21 
3.50MB Free 3G @ Rs.39 
4.100MB Free 3G @ Rs.90 
5.250MB Free 3G @ Rs.201 
6.500MB Free 3G @ Rs.351 Send:1 Receive:Hi! You have requested for a pack that is valid for 1 day. Select 1 to activate or select 2 to go back to the main menu 1.Activate 2.Back Send:1 Receive:Hi! We have received your request. This will be activated within 2 hours.

How to get paypal to release your funds


I have a way to get paypal to release your funds.
You simply refund the payer (Person who got your funds on lock) a small amount ($.10 cents) works just fine, and the funds will be released from lock. Worked for me on a recent purchase where a buyer tried to screw me.
Try yourself and enjoy !!

Some Andriod Secret Codes.


codes are listed below:


*#*#4636#*#* - Phone Information 
*2767*3855# - HARDWARE  RESET 
*#*#34971539#*#* Shows completes information about the camera
*#*#7594#*#* Changing the power button behavior

*#*#273283*255*663282*#*#* For aquick backup to all your media files
*#*#197328640#*#* Enabling test modefor service activity
*#*#232339#*#* OR *#*#526#*#* OR
*#*#528#*#* Wireless Lan Tests
*#*#232338#*#* Displays Wi-Fi Mac-address
*#*#1472365#*#* For a quick GPS test
*#*#1575#*#* A Different type GPS test
*#*#0283#*#* Packet Loopback test
*#*#0*#*#* LCD display test
*#*#0673#*#* OR *#*#0289#*#* Audio test
*#*#0842#*#* Vibration and Backlighttest
*#*#2663#*#* Displays touch-screenversion
*#*#2664#*#* Touch-Screen test
*#*#0588#*#* Proximity sensor test
*#*#3264#*#* Ram version
*#*#232331#*#* Bluetooth test
*#*#7262626#*#* Field test
*#*#232337#*#* Displays bluetooth device address
*#*#8255#*#* For Google Talk servicemonitoring
*#*#4986*2650468#*#* PDA, Phone,Hardware, RF Call Date firmware info
*#*#1234#*#* PDA and Phone firmwareinfo
*#*#1111#*#* FTA Software version
*#*#2222#*#* FTA Hardware verion
*#*#44336#*#* Displays Build time andchange list number
*#06# Displays IMEI number
*#*#8351#*#* Enables voice dialinglogging mode
*#*#8350#*#* Disables voice dialinglogging mode
**05***# Execute from Emergency dialscreen to unlock PUK code
*#*#7780#*#* Wipe data/factory reset

Saturday, January 26, 2013

Integrate Facebook With Google+


Google+ is the current hottest social networking website.People are navigating from facebook to test this new social networking website.So,many of us have our accounts on both Facebook as well as Google+.Now you can integrate Google+ and facebook and can see the news feed of both from a single window.
There is a plugin wisely named Google+Facebook which will add an extra tab in your google+ account using which you can access your Facebook news feed.You can alsolike ,comment or add status updates to facebook from your Google+ account.Google+Facebook extension is available for Google Chrome,Internet Explorer and Firefox browsers.


Thursday, January 24, 2013

Nvidia GeForce GTX 690 Review - World's fastest graphics card


Nvidia GeForce GTX 690
  • Pros
    Excellent performance, parity with GTX 680 SLI setups. Highly power efficient. Attractive design.
  • Cons Obscenely expensive. Blocks a second expansion slot.
  • Bottom Line
    Nvidia calls its newest dual-GPU video card, the GeForce GTX 690, the fastest ever, and we can't disagree. Just know that's also one of the one most expensive.
AMD and Nvidia are notorious for routinely trading off the trophy for the best video card on the planet. But judging from Nvidia's latest release, the GeForce GTX 690, we can't help but wonder if the company may hold onto it for slightly longer than usual this time. This isn't just because of its speed, which is considerable, but also because of how well it holds up against two GeForce GTX 680 cards united in Scalable Link Interface (SLI) mode, and because of its power usage—which may just be its most attractive feature. Alas, there's always a "but," and the GTX 690's is its price: a whopping $999 (list), upping the bar that other dual-GPU cards have set around $700-$800. But if you crave the speediest and most power-efficient card you can get, don't let price stand in your way of this one.

Given that it's based on two GK104 GPUs (the same used in the GTX 680), there's not a lot to say about the GTX 690 from a chip-level standpoint that we haven't already said; there's mainly just a lot of multiplying by two to be done. Eight Graphics Processing Clusters (GPCs) mean 16 advanced Streaming Multiprocessor (SMX) units, 3,072 CUDA parallel processing cores, 256 texture units, and 64 ROP units. There's a total of 4GB of GDDR5 video memory, running at 6.008GHz over two 256-bit memory interfaces.

But the clock speeds are the same: 915MHz at the default level, but capable of accelerating to 1,019MHz on average when GPU Boost, Nvidia's new system for dynamic overclocking when the headroom exists for it, activates. And like a single GTX 680, there are four display outputs (three dual-link DVI and one Mini DisplayPort) that let you connect up to the four monitors to the card at once. The card has a TDP of 300 watts, and Nvidia recommends a power supply of no less than 650 watts if you want to install the GTX 690.

Where the GTX 690 differs from the GTX 680 is in its design. Whereas dual-GPU cards traditionally just extend the design elements of the series they lead, the GTX 690 abandons the GTX 680's (tried-and-true) black plastic style in favor of an entirely new and fresh approach. Nvidia claims that these innovations have practical applications, and in case of the cast aluminum frame with trivalent chromium plating, fan housing made from an injection-molded magnesium alloy, dual–vapor chamber cooling system (with dual-slot heat sink and an aluminum base plate) that expels heat via a center-mounted axial fan, and ten-phase power supply with a ten-layer two-ounce copper PCB that's undoubtedly true. But the polycarbonate windows on the card's front and the GeForce logo on the side that glows when the system is powered on suggest that Nvidia was just as concerned with delivering a prestige object to those willing to shell out a cool grand to be able to better play games. (And, if you ask us, that's actually not a terrible reason in this case.)


In any event, the usual caveats with big video cards apply. The GTX 690 blocks a second expansion slot, requires two PCIe power connectors (both eight-pin, a diversion from the two six-pin plugs used on the GTX 680, though understandable given the card's beefy stature), and may be too long to fit into smaller cases. (But like its immediate predecessor it's shorter than we're used to, so you'll have a better chance of it working in your system.)

Performance
Performance on the GTX 690 is, of course, excellent—which makes sense for a fusion of two units of the fastest single-GPU card out there. It dominated AMD's last-generation dual-GPU behemoth, the Radeon HD 6990 , in practically every gaming test we threw at it, which is to be expected. Sample scores: 59.8 frames per second (fps) versus 53.6fps in Aliens vs. Predator, 74fps versus 57fps in Batman: Arkham City, and 84fps versus 45.9fps in Lost Planet 2—in each case running at 2,560-by-1,600 resolution, with maximum details enabled. The one test where the GTX 690 didn't triumph? Total War: Shogun 2, where the 6990 came out ahead with 27fps versus the GTX 690's 23.3fps—but more on this in the next paragraph.

It's worth noting, however, that the GTX 690 is rarely faster than two SLI-connected GTX 680s. It keeps up incredibly nicely with the pair of cards; it just doesn't surpass them in terms of speed in most cases. Granted, because the frame rates we're talking about here are so high, this isn't a big deal—can you tell the difference, for example, between Batman: Arkham City running at 76fps and 74fps, and Lost Planet 2 running at 86.4fps and 84fps?—but those who've already splurged on two GTX 680s can still feel satisfied with their purchase. (One note about performance here: There was functionally no discernible difference between the two GTX 680s and the single GTX 690 running Total War: Shogun 2. We asked Nvidia about this, and were told that a recent patch to the game has hindered multi-GPU performance somewhat—this also likely explains at least some of why the 6990 looked faster on the same game. We can't guarantee that you'll be hampered by this problem, or that a future patch won't fix it, but it's something to keep an eye on for now if you play that game.)

As was the case with the GTX 680, the defining characteristic of the GTX 690 is its power efficiency. Our full Intel X79 Express–based test system drew (as measured by way of an Extech Datalogger) 110 watts when idle, and 413.7 watts under the full load of a maxed-out Metro 2033 benchmark run. That's impressive as it is, but it looks even better compared with the GTX 680 SLI setup, which drew 116.7 while idling and 469.6 watts under load: Maybe the two cards have the tiniest of performance edges, but the power savings will unquestionably prove much more significant over the long run. An interesting side note: The GTX 690 also drew less power than either the 6990 (125 watts while idling, 424.9 watts under load) or two Radeon HD 7950  cards in a CrossFireX configuration (110 watts while idle, 415.3 watts under load).

Nvidia has done a remarkable job with the GeForce GTX 690, turning out a card that's worth bragging about—and bestowing our Editors' Choice award upon—for reasons that go well beyond merely its speed. We have no doubt that AMD is working on its own dual-GPU card at this very moment (we'll even venture a guess at its name: the Radeon HD 7990?), but unless the company effects a substantial revamp of its current generation's architecture, that card is going to have a hard time competing with Nvidia's. In performance, power usage, and appearance alike, it's not just the card to beat—it's the card to cherish.

Gila Professional Gaming Mouse - Quick Review


Last Article is just about the Launch. This Review will give you some details about the Mouse.
 
Genius launches  the Gila professional gaming mouse, a 2013 CES Innovations Award Honoree, to the North American market. Offering unparalleled precision and comfort, the Genius GX Gaming Series Gila is the ultimate configurable gaming mouse. With the 12-button Gila almost every aspect can be tweaked according to gamers' preferences: on-the-fly dpi changes, weight, LED brightness, pulsation and color as well as macros for a personalized playing style.

Precision Control with Sniper Mode and On-The-Fly Adjustable Dpi: 200 to 8200

The Gila packs features for gamers that need to excel. For situations that require pixel perfect precision "Sniper Mode" slows down mouse movements to a dpi of your choice by simply holding down the assigned button.

Genius' GX Gaming Series Gila lets gamers switch among 5 different previously assigned dpi levels directly from the mouse for precision targeting (200 dpi) to lightning fast movements (8200 dpi). Adding Gila's 1 ms response time to aid in situations that require quick twitch reactions, this GX Series mouse is capable of keeping up with any gaming scenario.


Personalized Weight Tuning
Customize the weight of the Gila however you prefer. A maximum of six 4.5 gram weights can be added to a compartment in the underside for sturdiness or no weights can be used at all for unburdened lightweight movement.

Unique LED Customization Options
Offering unique aesthetic customization options, the Gila has three LED backlights that can be independently tuned to the colors, degrees of brightness and pulsation style of your choice. With 16 million color options to choose from your Gila will be uniquely yours.

Macros & Button Assignments
Simplify the complicated controls of modern games by assigning them to any of the twelve buttons on the Gila. The Scorpion UI lets you set up to 72 macros, giving you a competitive edge in the heat of battle. The macros saved on the on-board memory and CPU of the Gila means that macro-blocks in games won't be able to stop you from using your macros. At LAN parties or competitions no time is lost tweaking exactly how you like to play.

Comfortable Grip & Connectivity
The Genius Gila not only gives you personalized control when hunting down your foes, but also provides a smooth, stable connection with a comfortable design. The non-slick rubber coating ensures a firm and comfortable grip when moving the mouse violently back and forth. Additionally, the 1.8 meter durable braided cable with an anti-corrosive gold-plated USB jack ensures long-lasting, high quality connections.

Availability
The GX Gaming Series Gila is now available in the US and Canada for the suggested retail price of US$99.99.

Product Highlights
  • Professional 12-button MMO/RTS gaming mouse
  • Adjustable dpi with 5 step dpi gauge
  • Independently adjustable LED backlighting in 3 areas (16 million color options)
  • Adjustable metal weights 4.5g x 6 with storage case included
  • Capacity for 72 macros
  • On-board memory and CPU to beat macro-blocks
  • Lightning fast 1 ms response time
  • Comfy rubber finish grip for complete control and handling
  • MSRP: US$99.99

Tuesday, January 22, 2013

Recover files from formatted hard drives from EaseUS Data Recovery


Format partition

Symptoms

Where previously the computer would boot and be usable, systems that have been Formatted often report the following errors: (these errors are frequently displayed on a black screen with white text.)
  • Operating System not found
  • Invalid or corrupt FAT
  • Cannot find file or program
  • Invalid command.com
  • Primary/Secondary Hard disk failure
  • Non system disk
  • Disk error
Or when a partition has been formatted, the all data would disappear.

To unformat files from formatted drives, please follow this procedure:

1. Download EaseUS Data Recovery Wizard, install it and launch it. Click the "Complete Recovery" button on the main window of Data Recovery Wizard. (If you cannot boot the computer, please use data recovery bootable disk or connect the hard drive to another computer as slave to recover lost data.)

Note: If the hard disk has mistakenly deleted volumes, hidden volumes, drives with failed operation/file system, you should use "Partition Recovery".

Data Recovery Wizard
2. Select the file types you want to recover. Tick 'Search all lost files automatically' to find all lost file types. Tick 'Ignore bad sectors' to skip bad sectors when scanning.

Select file types
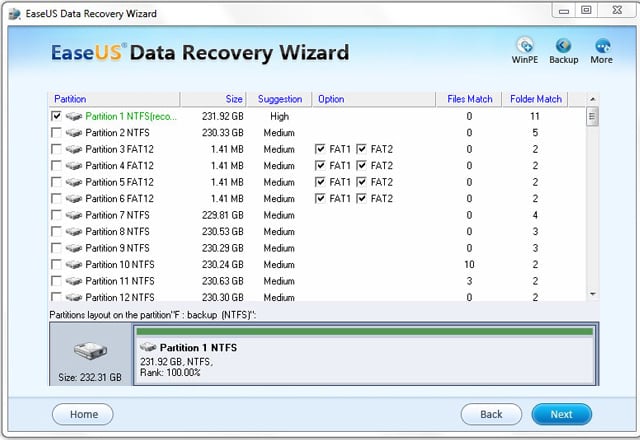
3. The second screen on the "Complete Recovery" tool will display a list of volumes found on the drives found in your system. If the volume does not have a drive letter, then the volume will be listed at the hindmost and the drive letter will be instead by "*".

4. You should choose the volume that was formatted and click "NEXT" to start searching on this volume.

Format Recovery
5. The Intelligent Searching module will scan on the selected volume, collect and analyze every byte on the volume, then show you a list of volumes which are possible on it.

Format Recovery
Format Recovery
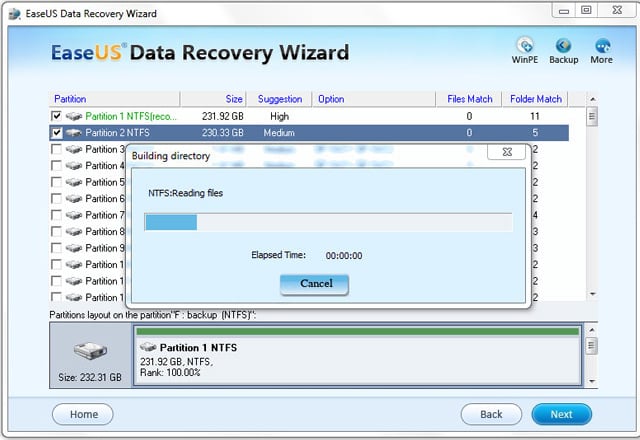
6. After this scanning is finished, Data Recovery Wizard will permit you choosing 4 volumes at best to recover the data. And then, press "NEXT" button. The Data Recovery Wizard will launch the "Building directory" procedure to searching the files. You will see file/folder tree very soon.

Format Recovery
7. Select the file or directory that you want to recover and press the "Next" button.

Format Recovery
8. Select a directory and press the "NEXT" button to save the data.

Caution: Saving file(s) to the partition or drive where you are recovering data, for it may result in overwriting data and permanent data loss!

Monday, January 21, 2013

Run Chrome OS on Any Windows PC using 4GB USB Stick


Google Chrome OS comes bundled with Chromebooks and Chromebox. Either you will have to purchase these devices from nearest retailers or you may run Linux Distributions of the Chrome OS on any other device including your existing Windows PC or Mac. Linux Distributions of Chrome OS are based on the original Google Chrome OS with limited compatibility. There is an open source installation available on Chromium project site (Google Chrome OS is a modified version of Chromium OS) to install Google Chrome OS on non-chromebook devices but it involves few tech savvy steps. Don’t worry, if you want to try the Chrome OS ( Always a new computer ) without much effort, checkout a simple way to run Chrome OS on non-chromebook devices (like Windows notebooks, netbooks, laptop, desktop etc.) by just booting the device using 4GB+ USB pen drive.


Follow the steps below to get Chrome OS running in less than 5 minutes.
  • Download either of these two Linux Distribution of Chrome OS – VanillaOr Lime (size of any of these files ~250MB)
    • Vanilla is the basic version of linux distribution whereas Lime is having better support for different hardware devices like Ethernet and sound drivers
  • Unzip the downloaded file, you can see a IMG file of size ~1.91GB in the unzipped folder
  • Download the binary copy of Windows Image Writer and Double-Click on the EXE file from the downloaded folder
  • Locate the IMG file in this application and also select the USB drive where you want to write this IMG file. Don’t forget to format the USB stick before writing the image file. The minimum recommended size for USB drive is 4GB.
  • Click on ‘Write’ button to start writing the image file to the USB drive or stick
  • Boot your netbook, laptop or desktop using that USB drive. You will see Chromium OS booting and asking for the details like Keyboard, Language and Available Network. Provide these details. You will be ready to enter Google credentials and login to the Chrome OS.
Chrome OS will welcome you with Google Chrome help document. You can navigate to the different options like settings, web store etc.

The desktop of Chrome OS is having only one option i.e. ‘Change the Wallpaper’. Here is how the desktop of Chrome OS looks with a pre-installed wallpaper.


Cloud Print
Chrome OS is all about cloud computing as you store most of your data on cloud and access that from there only. If you want to print a document, you can use Google Cloud Print application which is available on Chrome browser settings panel. You just need to locate the printing devices (Cloud Print ready Printers or normal old printers).


Always a New Computer
Google and Samsung promote the Chromebook or Chromebox as “Always a new computer” because everything is on cloud and the OS, browser etc. gets auto-update without any charges. You are not storing anything on local device and whenever you change your Chromebook or login to your friend’s Chromebook with your Google Credentials, you will see all your apps and bookmarks there as well (just like your own Chromebook).

This is true with this Linux distribution as well. As you are using Google Credentials in this Chrome OS to login, your data will be synchronized with your Google Account. Whenever you login to a Chrombook or Chrome OS Linux Distribution, you will be able to see all your apps and bookmarks everywhere.

Sync all your data like bookmarks, settings, apps, extensions, passwords, autofill, themes etc. in Chrome OS

How much do you save by NOT purchasing a Chrombook or Chrombox?

I am not saying that with this Linux distribution you are having the same device and OS as Chromebook but it is really really close. Google Chrome OS is also based on Ubuntu and Chromium OS which are open source but Google is shipping Chrome OS with Chromebooks only. This Linux distribution is having all the capabilities of Chrome OS (with some bugs and fixes) and it runs as smooth as any other operating system.

Tuesday, January 15, 2013

Read facebook messages without them knowing

Since recently, when several people chat together, I can see Seen by abc" appearing when one of the person sees the last message. Its very irritating feature of facebook.


Want to remove this feature ? With this post you can know how to read facebook chat messages without seen. There is no default setting of facebook to disable this feature. But there is browser extension to remove it. With this installed, the person you are chatting with will not be able to tell when you have ‘seen’ their message.
If you are using google chrome browser then install this extension in your browser.

and if you are using mozilla firefox then install this extension in your browser.

Sunday, January 13, 2013

Free .in Domain and Hosting for 1 Year !


Websites made Free, Fast and Easy for All Indian Businesses!

Across India, more and more people are connecting with local businesses online. Make sure they connect with yours with a free professional website. Help customers find you easily and be where they are. It's easy. Really fast. And absolutely free. So get your business online.
Here's what you'll get:
  • Free easy-to-build professional website
  • Free .in domain name and hosting for one year
  • Free 365 days support

6.5 % Discount On Ebay


1. Buy an item on eBay on or before 13th Jan 2013
2. Select “Pay using PaisaPay”
3. Enter Gift Coupon code. Pay the balance using online banks transfer / credit card

Code: WEEKEND100

Max Discount of Rs 1000
Min Purchase of Rs 1000
First come first serve
*eBay Coupon is not redeemable against “Deals” Items

Saturday, January 12, 2013

iPhone Tricks And Tips


Restart your iPhone
Press and hold both the Home button and the Sleep button to restart your iPhone. After a moment, a white light will flash, the screen will shut off, keep holding the buttons until the screen turns back on.
Use the compass with maps
Press the location button in maps twice to use the built-in compass to orient the map based on the direction you are facing.
Focus the camera
While shooting videos or photos, press the screen where you want to focus. iPhone will also adjust the exposure and white balance automatically.
Take a screenshot
Hold the home button and the Sleep/Wake button. The screen will flash in white and the screenshot will appear in your Camera Roll.
Create web clips
To add a website to your Home screen, visit the page in Safari and tap the plus sign at the bottom of the screen. Now tap Add to Home screen.
Zoom the camera
Press the screen to bring up the zoom control, then use the slider to zoom in and out up to 5 MP.
Scrub through audio and video
When you are watching a video or listening to music or a podcast, the scrubber bar lets you skip to any point along the timeline. You can adjust the scrub rate from high-speed to fine scrubbing by sliding your finger down as you drag the play head along the scrubber bar.
Create an iPod playlist
In the iPod app, tap Playlists, then tap Add Playlist and give it a name. Now tap any song or video to add it to the playlist. You can add individual songs, entire albums or all songs by an artist.
Locate your lost iPhone
If your iPhone goes missing, Find My iPhone can help you locate it and show its current location on a map. Display a message on its screen, remotely set a pass code lock, or initiate a remote wipe to delete your private data.
Save image from web pages
To save any image from the web to your camera roll, simply press and hold the image. A menu will appear asking Save image or Cancel. Once the image is saved in your camera roll, you can set it as wallpaper.
More keyboard and input tricks
Tap the space bar twice, and iPhone adds a period and capitalizes the next word.
To enter a number or symbol quickly, touch and hold 123, the select the key you want. Lifting your finger returns you to the alphabet keyboard.
Hold a letter to reveal a list of special characters.
Hold down the .com key for .net, .edu, .org keys. Note: Slide your finger from .com to .net/.edu/.org, rather than lifting and pressing.
Find the text you want to edit in a note, email, web page, or other app. You can select a word by double-tapping it, and select more or less text by dragging the grad points. Then press to cut, copy, or paste. To undo an edit, shake iPhone, the press the Undo button.
Print wirelessly from your iPhone
Air print makes it easy to print email and web pages right from your iPhone to your air-print-enabled printer. To print an email, just press the Reply icon and select Print. To print a web page, press the Action icon and select Print. You can also print photos, documents, and more.
Email and Text management
In Email, you can delete or move messages in batches. From your inbox, press Edit, check off the desired emails and then choose Delete or Move.
Delete email messages and text conversations without opening them, simply cross it out by swiping your finger across the email or the text conversations, then press Delete.

Friday, January 11, 2013

How to invite friends on facebook page

In this post i will tell you how to invite your facebook friends on facebook fanpage. If you are admin of fanpage then you can invite your friends by selecting each friends manually. It will take lots of time and energy. I have a solution of this problem. With this post you will come to know how to invite all your friends on Facebook to your event in one go.

  • Make sure you are using Mozilla Firefox Or Google Chrome web browser.
  • If you don’t have Firefox Or Google Chrome then first download it.
  • Make Sure Bookmark Bar is visible.
  • If not visible then right click on the top of Firefox Or Google Chrome and select “Show Bookmarks Toolbar”. This will make Bookmark Bar visible. (GOOGLE CHROME USERS VISIBLE WITH THIS CMD CTRL+SHIFT+B)
  • Now create new bookmark and add this script in the bookmark location -

javascript:var x=document.getElementsByTagName("input");for(var i=0;i<x.length;i++) {if (x[i].type == 'checkbox') {x[i].click();}}; alert('Done, all your friends have been selected');

  • Go to you facebook page.
  • In “ADMIN PANEL” of page there is option “Build Audience” and then click on ” INVITE FRIENDS “
  • Load Your all friends.
  • Now after load your all friends click on that bookmark which you have created.
  • Wait few seconds and see your all friends automatically invited on your fanpage.

Free Facebook For Airtel Users !


Enjoy Free Facebook For airtel users !


Tuesday, January 1, 2013

Format any USB drives using command prompt!


Hi to all guys . now i am going to share a very useful tips . as sometime we are unable in formatting a pen drives.as it may be affected by virus or any other problem . so we can not format .so today am going to share a very useful trick that how to format an UN formatable pen drives using dos command. 


Follow The Given Below Steps for do this.

1. First insert your pen drive in any USB port.

2. Now go to run.

3.  Type this command format h: And the hit enter.

4.when you will hit enter then it will ask you that you want to format or not. Y or N !!! Hit Y and press enter

That's it..

Twitter Delicious Facebook Digg Stumbleupon Favorites More